Category: Game Moments

  • Chelsea v Newcastle

    Game Moments

    Hello again!

    Chelsea arrived after an away fixture against PSG in the Champions League, where poor individual performances and defensive errors resulted in a 5-2 defeat. They therefore looked to respond domestically, but Newcastle is one of the most challenging opponents for a recovery performance.

    First Half Analysis

    Chelsea initially focused on the right side, combining through Palmer and Gusto during the opening 15 minutes. Although they dominated possession in this period, they created only one clear opportunity from open play.

    Off the ball, Newcastle defended in a 4-1-4-1 mid-to-low block. In this structure, they left Anthony Gordon as the highest player, targeting to attack quickly from the transition play. By applying man to man pressure onto the double pivot of Reece James and Moisés Caicedo during Chelsea’s 2-2 build-up, Newcastle disrupted Chelsea’s ability to progress centrally.
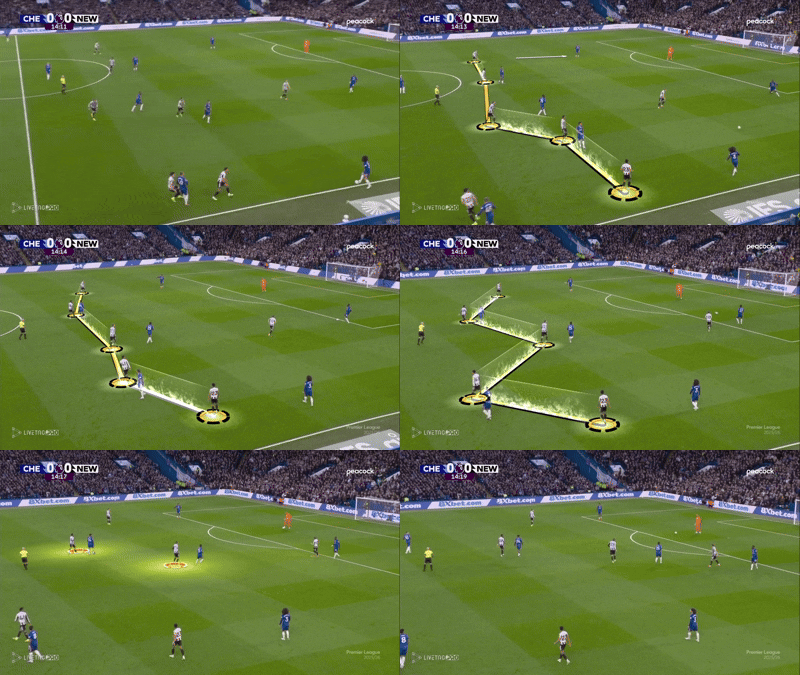
    Newcastle showed little intention to dominate possession in the early stages. Despite Chelsea’s intense high press limiting their time on the ball, Newcastle scored with their second meaningful possession sequence, completing a 15 consecutive pass move before finishing
    Chelsea’s consistently high defensive line, maintained in a flat back four, was again exposed. Following sustained possession, Livramento carried the ball through the half space. As Chalobah lost his position, a well-timed pass into the space allowed Joe Willock and Gordon to combine and give Newcastle the lead.

    Chelsea ended the first half with 66% possession, building primarily through the right side. Gusto alone delivered five crosses in the first half. Against Newcastle’s deeper defensive phases, Gordon remained close to Reece James to limit his involvement in build-up.
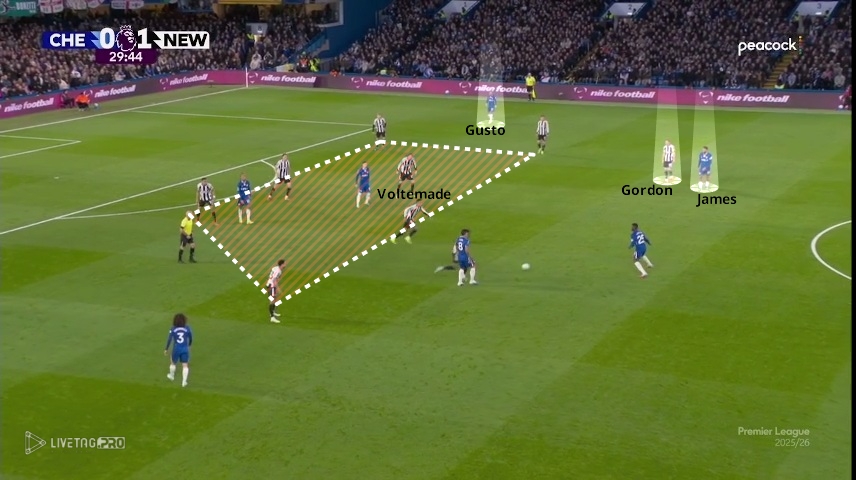
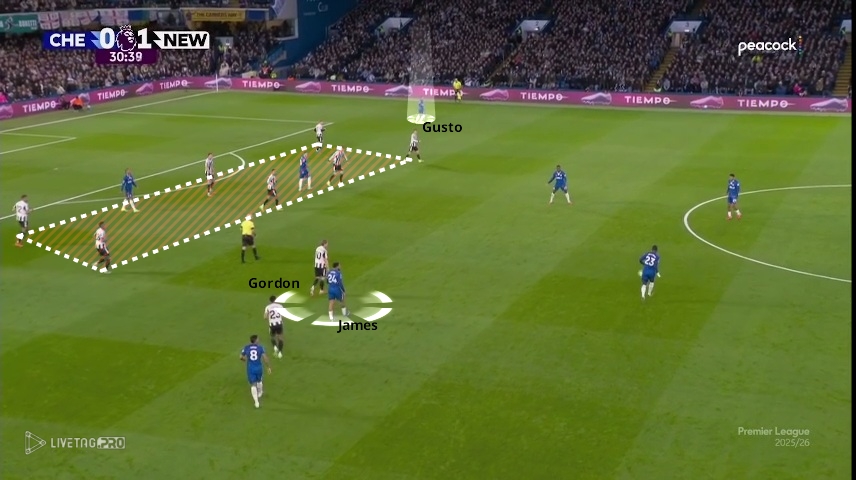
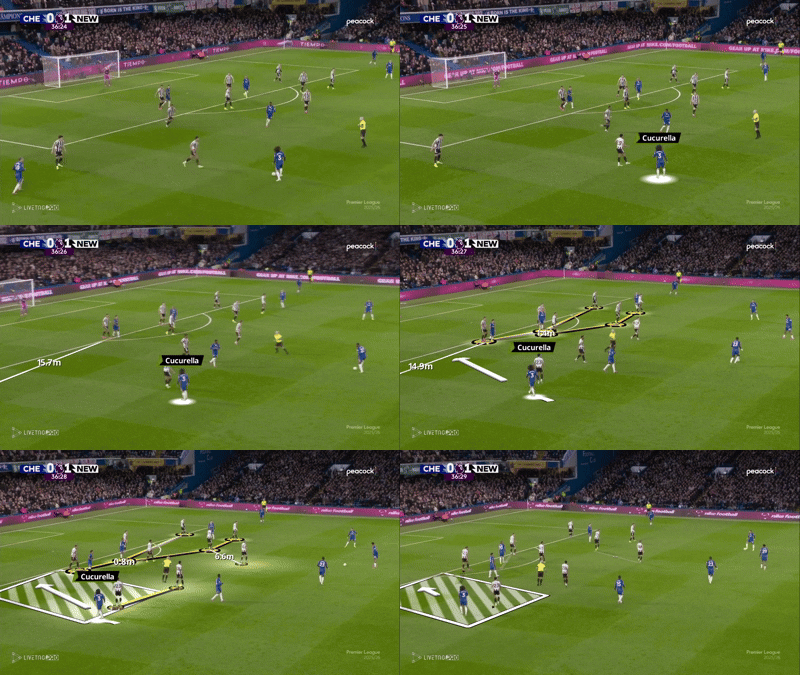
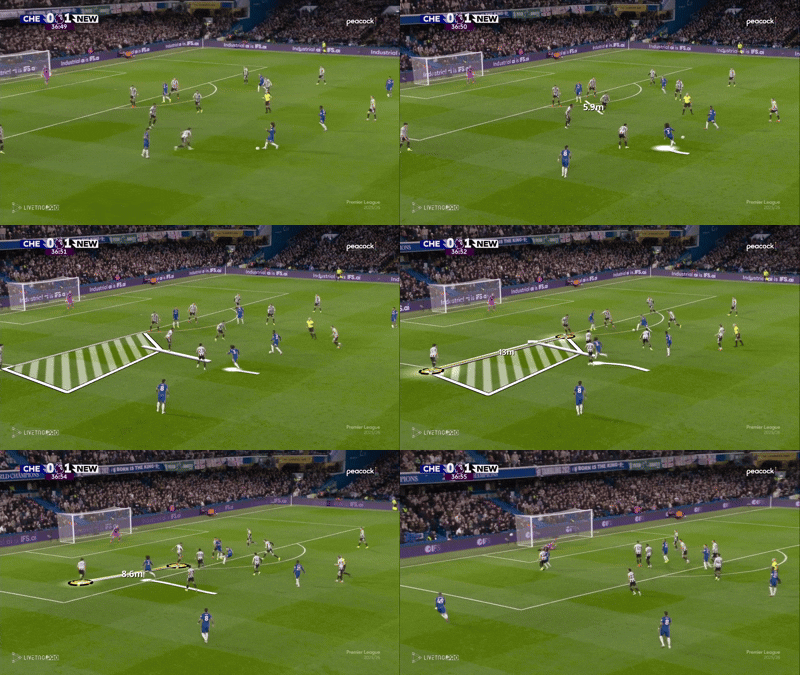
    In the first half, Alejandro Garnacho provided the width on the left side. With Livramento remaining tight to Garnacho, Marc Cucurella attacked the space between Livramento and Thiaw through underlapping runs into the half-space.

    Newcastle adjusted this approach in the second half. Livramento stayed narrower and closer to Thiaw, allowing Garnacho more space in wide areas while protecting the inside channel more effectively.
    Second Half Performance

    Chelsea began the second half with changes involving Gusto and Liam Delap. As a result, Reece James moved to right-back, and Chelsea shifted into a 4-4-2 formation with Delap and Pedro leading the line.

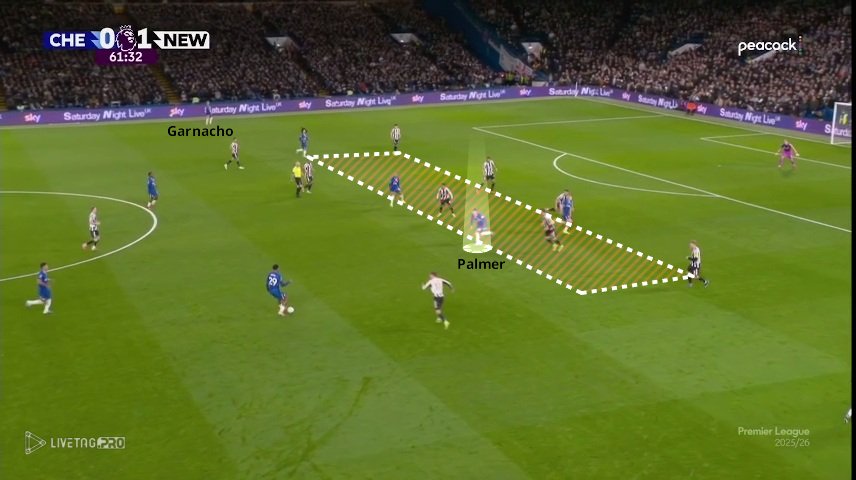
    Despite the structural change, their tactical approach remained largely the same.  Garnacho continued to provide width on the left, while James held the width on the right, allowing Palmer to occupy the half-space.  However, Newcastle’s 5-4-1 block effectively closed central spaces and prevented progression between the lines.
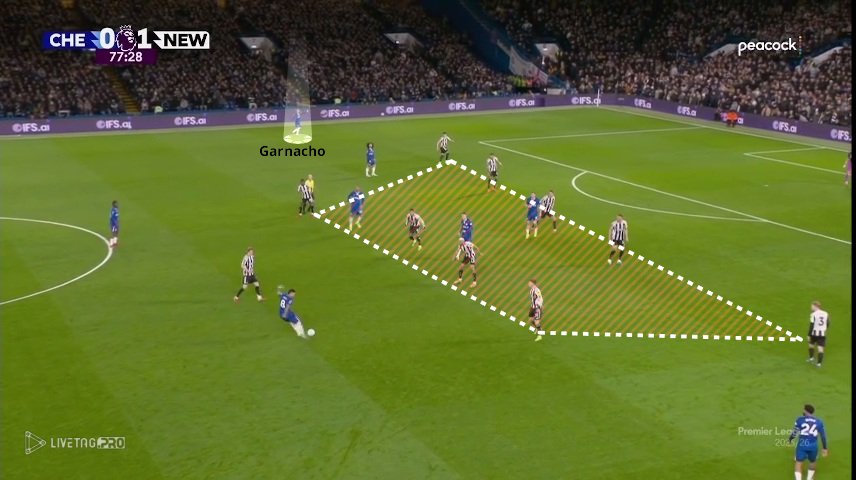
    Unable to create through central areas, Chelsea continued to rely on crosses throughout the second half. Although they managed to isolate Garnacho in 1v1 situations, he struggled to beat his opponent and failed to generate significant attacking output.
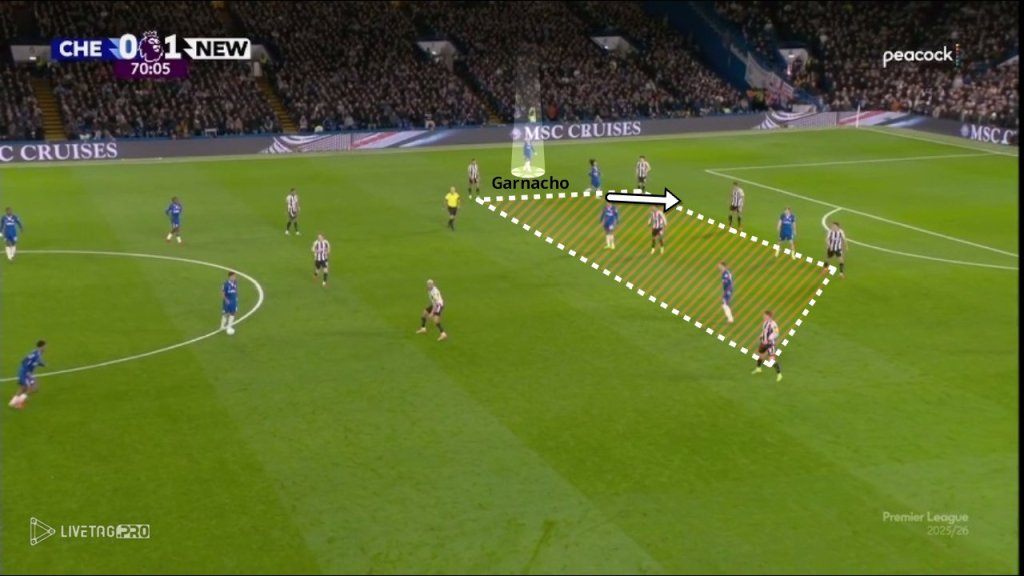
    Following the introduction of Hato and Fofana in the 82nd minute, Chelsea adjusted their build-up structure. They began constructing play with a back three, attempting to stretch Newcastle’s compact defensive block by increasing the width of the pitch. During this phase, Garnacho operated on the right, while Cucurella held the left touchline.

    Despite these adjustments, Chelsea was unable to create any clear chances and ultimately left the game without a result.


    Final Thoughts

    Chelsea’s use of a high defensive line in a flat back four once again proved costly. Newcastle’s compact defensive structure effectively closed central spaces and forced Chelsea to attack through wide areas.

    Chelsea delivered a total of 28 crosses during the match, highlighting their reliance on wide play.

    Newcastle’s decision to position Woltemade within midfield while leaving Gordon high provided a constant threat in transition, allowing them to attack quickly and efficiently after regaining possession.
  • Arsenal v Chelsea

    Game Moments

    Hello again!

    This is my first post in a while. I’ve been busy with personal matters, and recently, I bought a Remarkable tablet. It took me some time to understand its functionality, but with my limited experience so far, I find it very helpful for keeping notes organized. However, if you prefer traditional methods, this might not be for you, and you may want to stick with pen and paper.

    Now, let’s dive into last week’s game: Arsenal vs. Chelsea.

    First Half Analysis

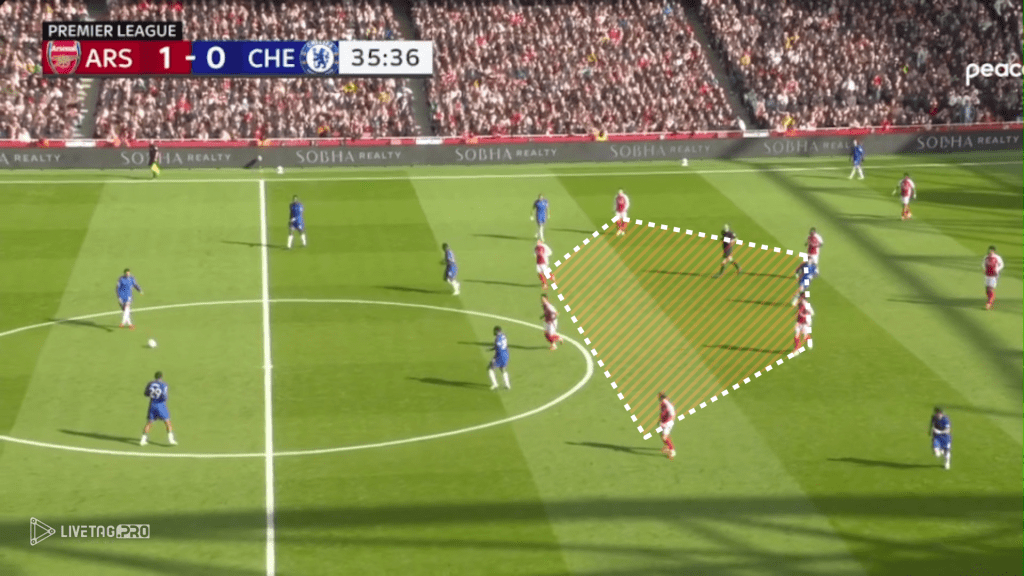
    Chelsea’s limited squad options restricted Maresca’s tactical flexibility. In the first half, they created a few dangerous opportunities from Cucurella’s side but failed to capitalize on them. With few options in central midfield, Maresca opted to use James as a No. 6 alongside Caicedo. Chelsea operated in a 4-4-2 formation and maintained a mid-block. Their compact shape forced Ødegaard to drop deep in the first half.

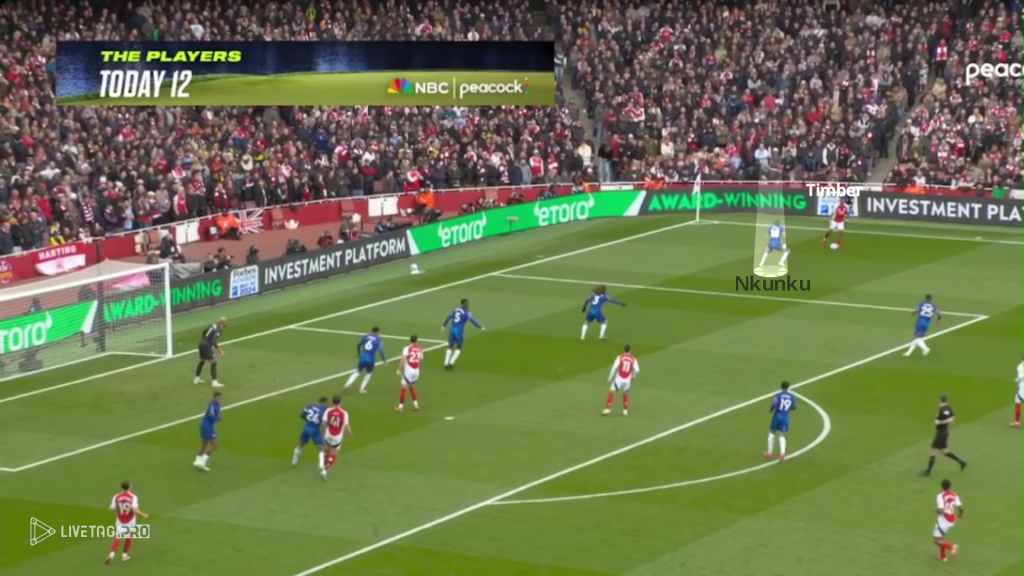
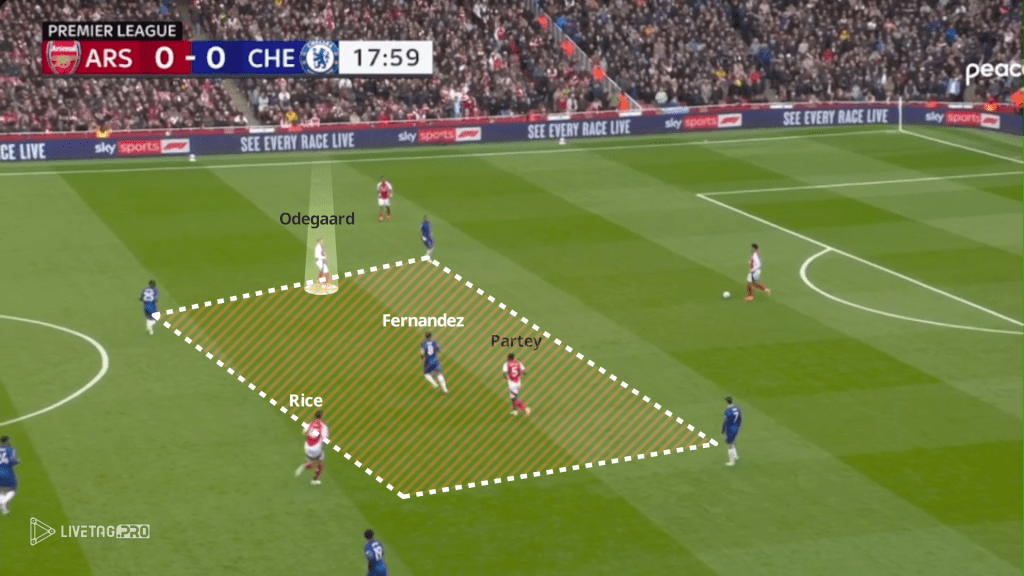
    Arsenal targeted Nkunku’s side in attack, aiming to exploit his defensive limitations. They created a few chances before Merino’s goal gave them the lead. As Ødegaard dropped deeper, Rice pushed forward alongside Merino. These two players frequently disrupted Chelsea’s defensive structure by pulling defenders out of position.

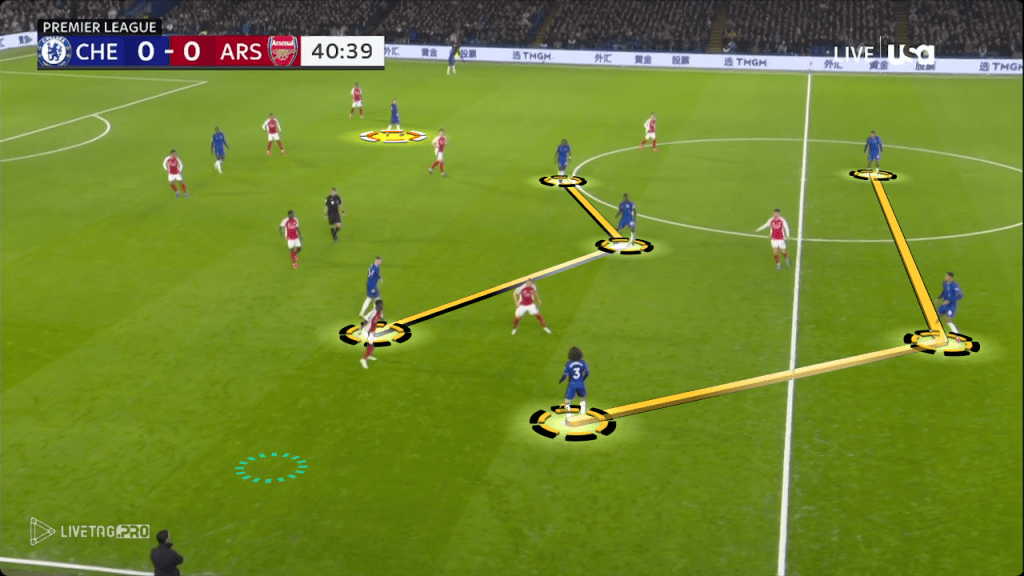
    During Arsenal’s build-up, Caicedo closely marked Ødegaard. However, the spaces Caicedo vacated were exploited by Martinelli, Merino, and Rice, who made runs behind Chelsea’s defensive line. After conceding, Chelsea maintained their 3-2 build-up structure, with James and Caicedo forming the midfield pivot. However, they lacked creativity against Arsenal’s defensive setup.

    After Arsenal’s first goal, Cucurella pushed higher up the pitch, creating a few attacking threats for Chelsea, especially against Arsenal’s 4-2-3-1 defensive structure. When Arsenal failed to win the ball in their high press, they dropped into a low block, limiting Chelsea’s ability to create chances due to their lack of width.  


    Second Half Performance

    In the second half, Chelsea continued their 3-2 build-up with Caicedo and James, but their front five remained too static, limiting their attacking threat. Arsenal slowed the tempo of the game and waited in a low block, making it difficult for Chelsea to break through. Even though Chelsea had more possession in the second half, Arsenal’s game plan allowed it, making it an ineffective advantage.


    Final Thoughts

    Considering Chelsea’s injuries and squad limitations, their defensive approach throughout the 90 minutes lacked creativity against Arsenal. The lack of playmaking ability from James and Caicedo in the midfield was noticeable. As seen throughout the season, Chelsea’s high defensive line struggled against Arsenal’s players, such as Martinelli and Timber, leading to several dangerous moments.

    Arsenal controlled the tempo of the game, and their ability to dictate play was evident throughout. In the second half, they managed the pace well, securing a comfortable victory at home.

  • Crystal Palace v Chelsea

    Game Moments

    Hello again!

    Today, I’ll be reviewing the key moments and overall performance from the Crystal Palace vs. Chelsea game.

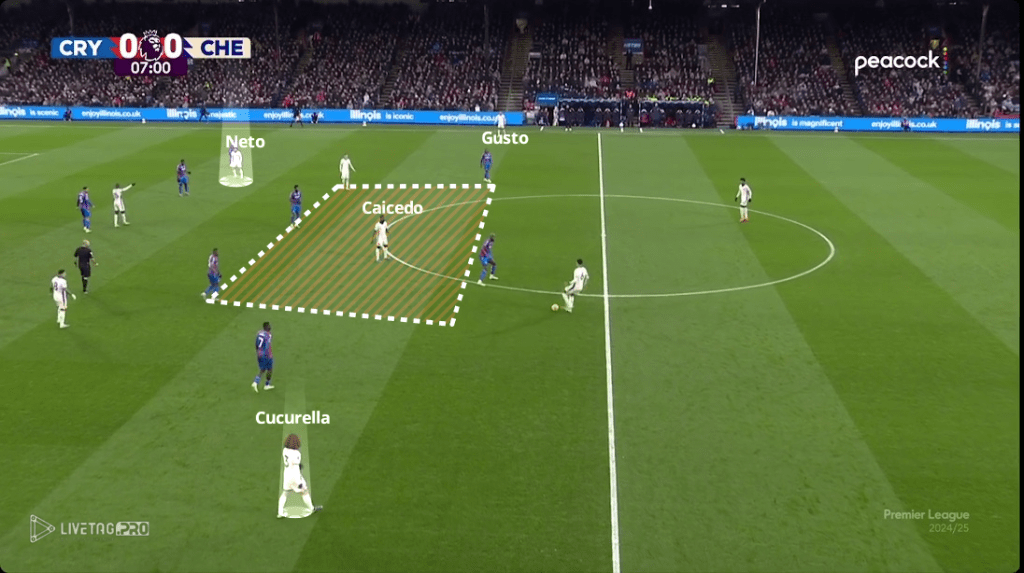
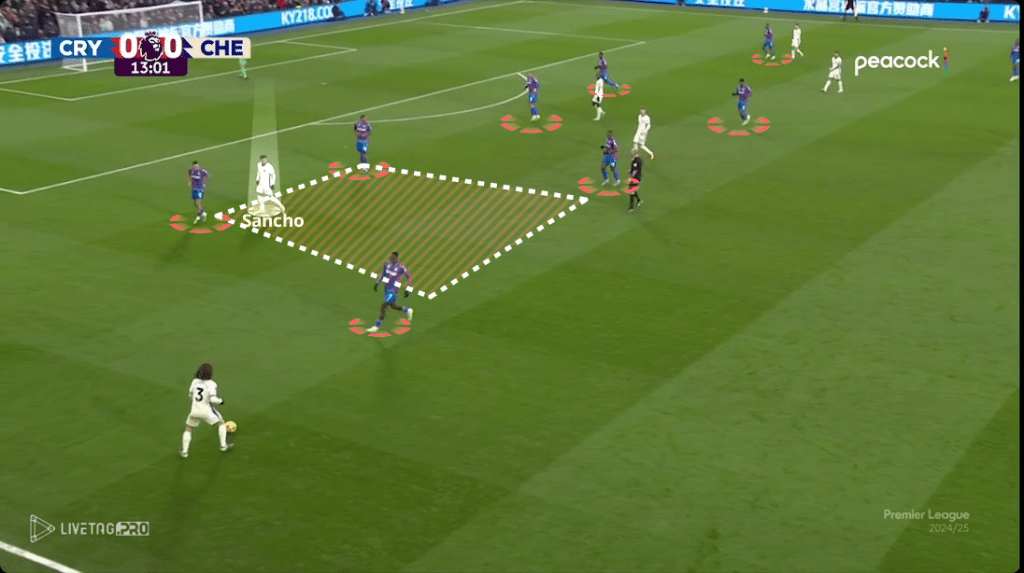
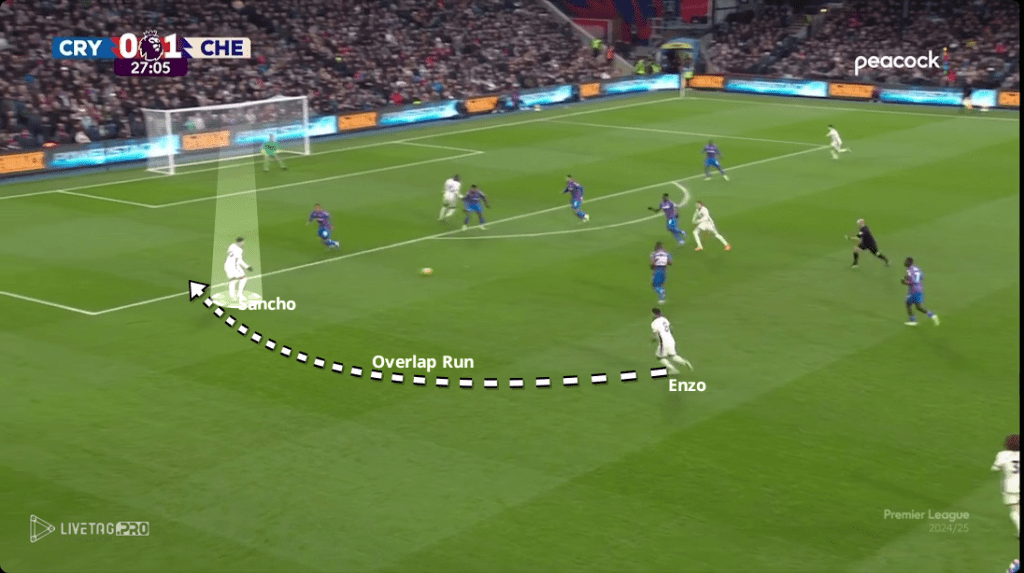
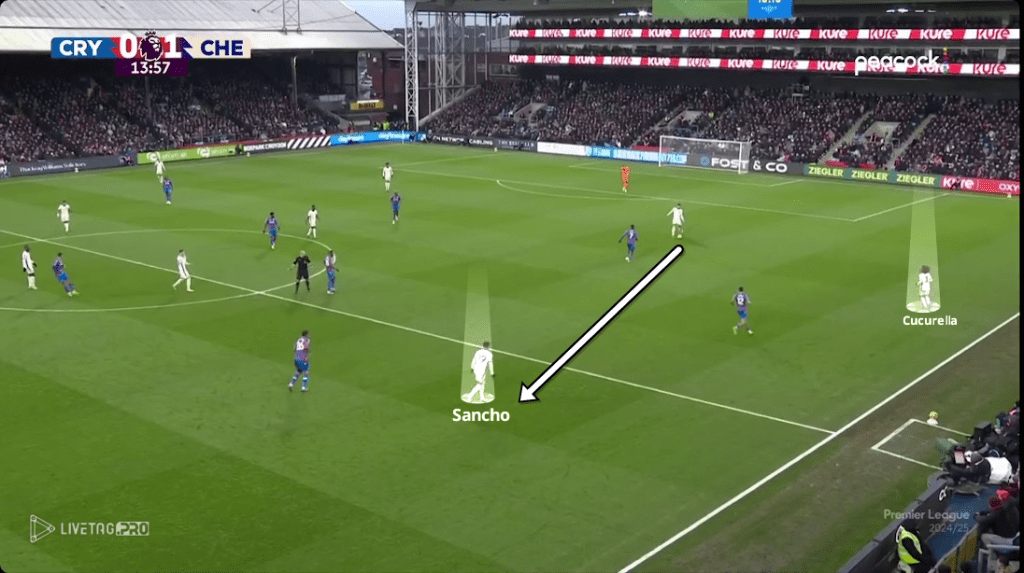
    Due to injuries in defense, Chelsea had to start with a lineup different from their usual pairings. Despite this, 17-year-old Acheampong delivered an impressive performance in his Premier League debut. Chelsea started the match with a 2-3-4-1 formation in their buildup phase. During this phase, both wing-backs pushed up to join Caicedo, forming a flat and wide formation in the midfield area. Caicedo operated as the single pivot, covering the central space, while Enzo pushed higher. Chelsea focused on using the wings, with Neto and Sancho looking to utilize half-spaces.

    Crystal Palace countered this setup with a compact 5-3-2 formation, defending in mid- and low-blocks to limit Neto and Sancho’s effectiveness in the half-spaces. Throughout the first half, Palmer stayed closer to Neto, while Enzo supported Sancho’s side. Chelsea frequently attacked down Sancho’s side, and Enzo and Cucurella creates changes with overlap runs from this side.

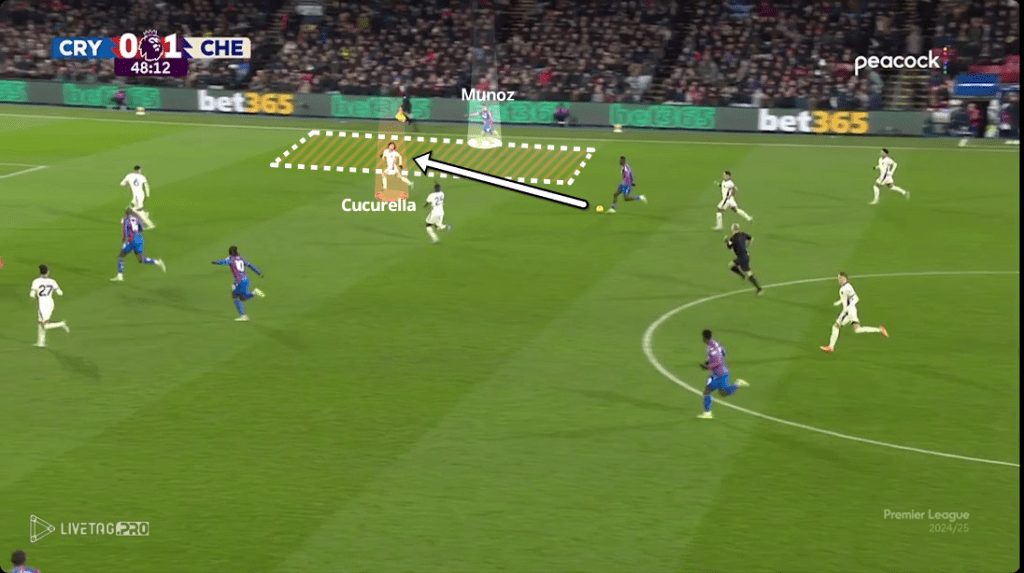
    Palace largely sat in a mid-block, remaining patient and looking to transition into attack when winning possession. During Chelsea’s high press, Palace tried to exploit the spaces behind Cucurella with diagonal passes, creating a few opportunities in the first half.
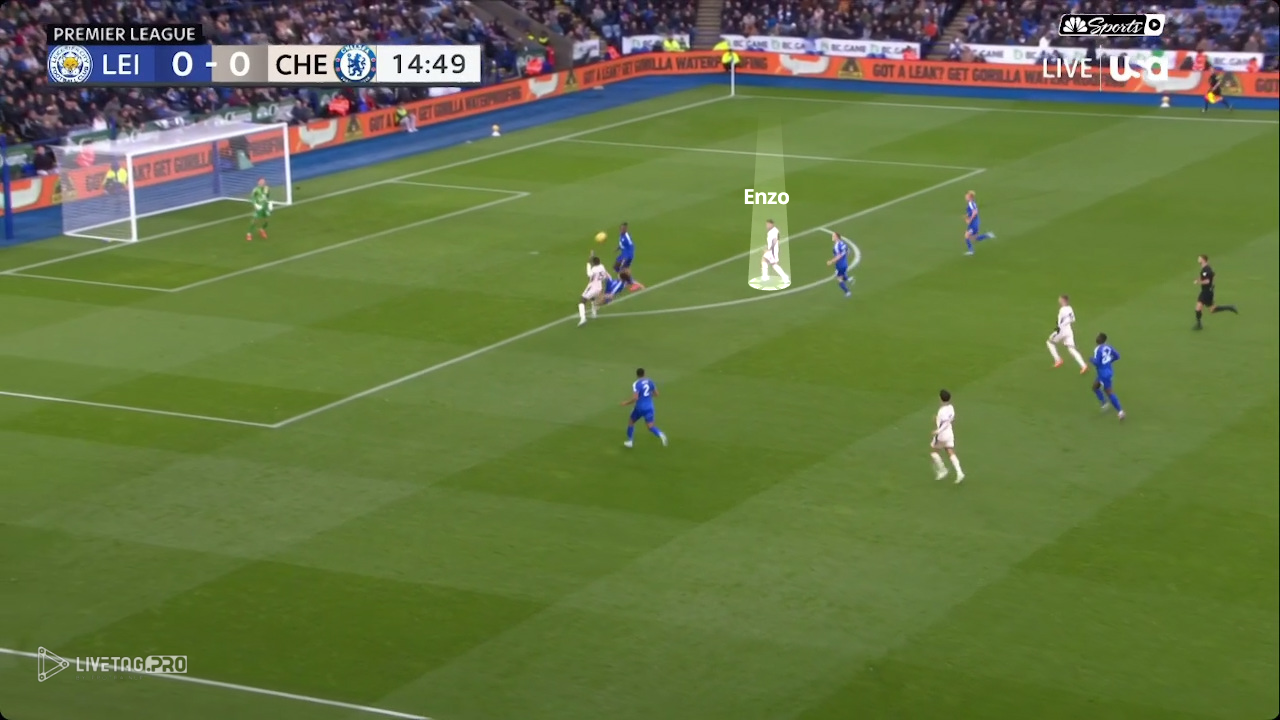
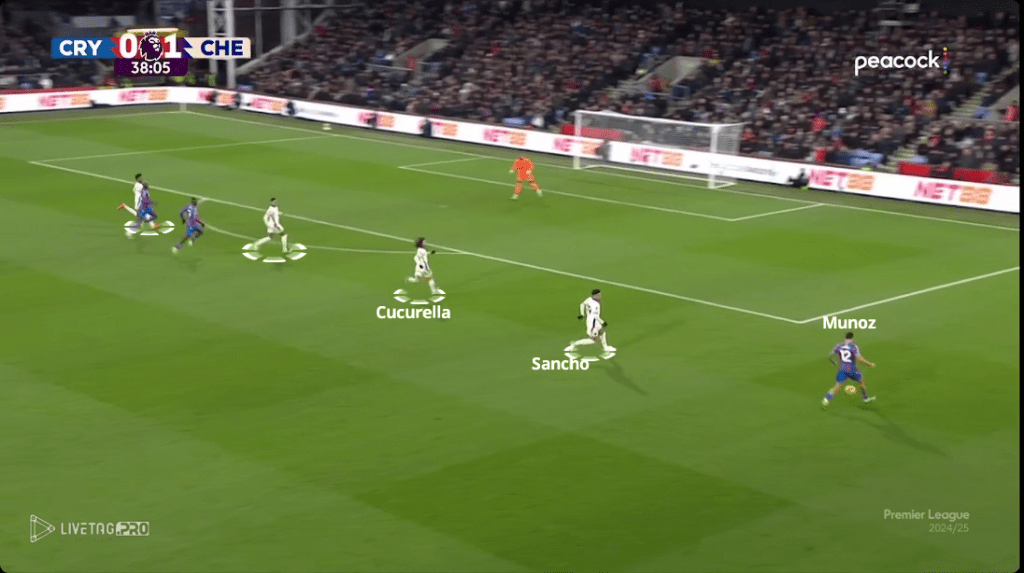
    Cucurella and Gusto provided width for Chelsea’s attacks. Cucurella’s advanced positioning forced Munoz into tough decisions, allowing Sancho to create a one-on-one situation in the half-space. This led to Chelsea’s opening goal, with Sancho assisting Palmer.


    Second Half Performance

    Crystal Palace, who had struggled to threaten in the first half, started the second half with an aggressive high press. Chelsea manager Maresca responded by swapping Palmer and Enzo’s positions, likely to address discomfort with diagonal passes targeting Cucurella’s side. Additionally, Gusto was given more freedom to attack, while Cucurella adopted a more defensive role in the second half.

    Despite Palace’s initial pressing efforts, they reverted to their first-half strategy of defending in a mid-block after 15 minutes. Palace continued targeting the spaces behind Chelsea’s wing-backs, particularly on Munoz’s side, creating some dangerous moments.

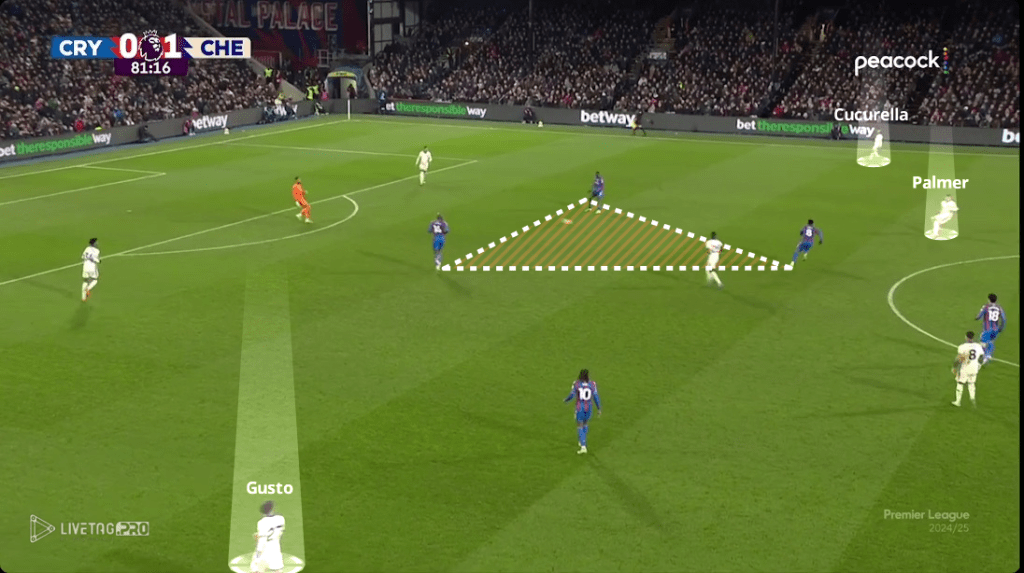
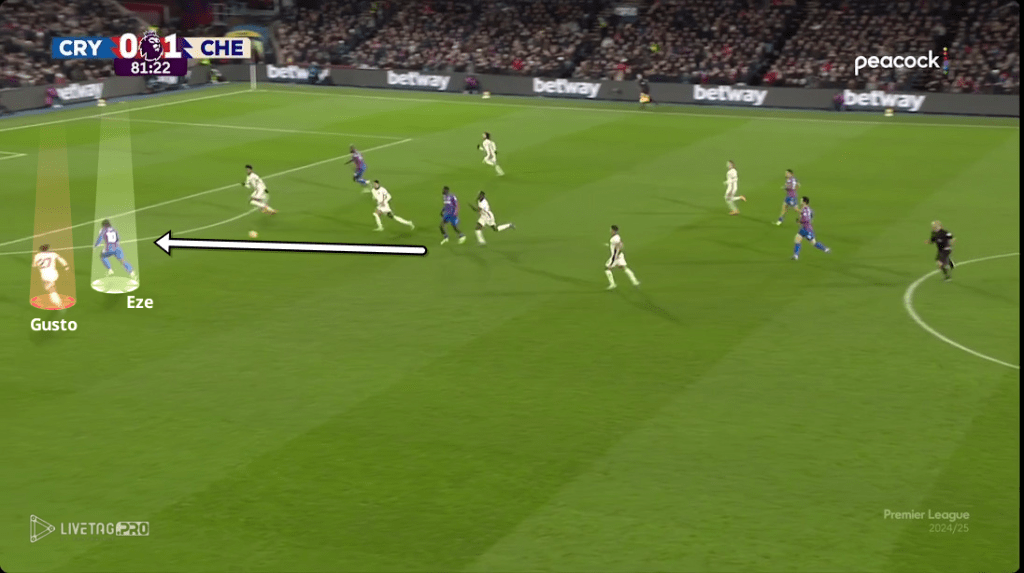
    hile pressing high, Palace left gaps in midfield, but Chelsea struggled to exploit these spaces. Enzo and Jackson came close to doubling the lead but failed to convert their chances. A turning point occurred when Palmer’s poor ball control during a buildup allowed Palace to counterattack. Eze capitalized on the mistake, quickly driving the ball forward. Gusto, who had been providing width during the buildup phase, couldn’t recover in time to stop Crystal Palace’s transition. Eze then passed to Mateta, who scored the equalizer.

    After conceding, Chelsea couldn’t mount enough pressure to create more chances and left Selhurst Park with just a point.


    Final Thoughts

    As the Crystal Palace manager mentioned in the pre-match interview, has Chelsea’s game plan become too predictable? Is their issue due to opponents effectively neutralizing their strategy, or is it simply down to inconsistent individual performances? What do you think?

  • Tottenham v Chelsea

    Game Moments


    Today, I’ll be analyzing the key moments, statistics, and overall performance from the Tottenham vs. Chelsea game.

    This match was undoubtedly one of the most entertaining games of the season so far. Both teams’ strategies and individual performances contributed to making it a exciting encounter to watch.

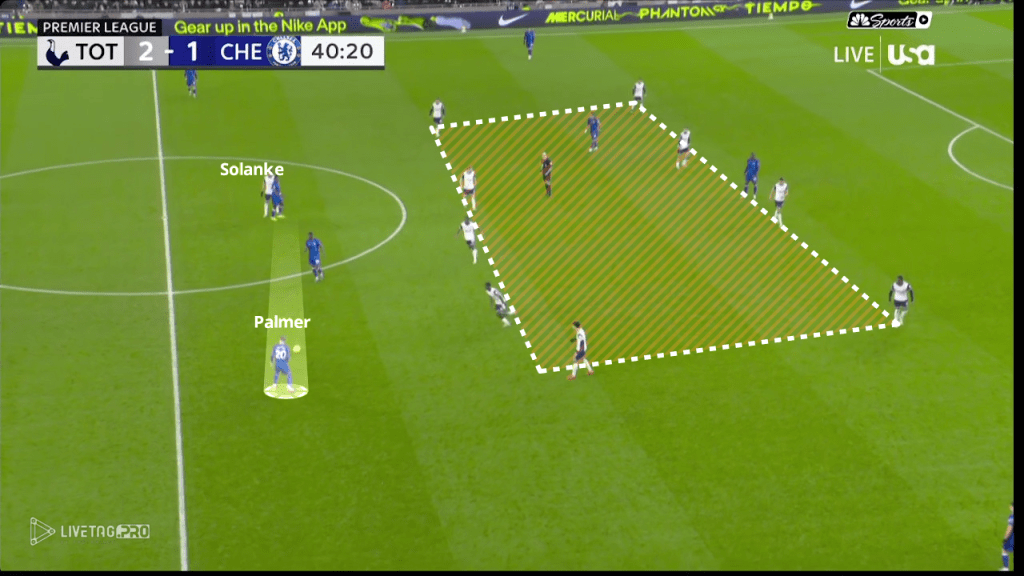
    From the very first minute, Tottenham started with a high press. The intensity of their press was so high at the beginning that Chelsea struggled to build from the back. Cucurella took on more defensive responsibilities in the first half. Chelsea attempted to build up in a 2-3 formation, with Caicedo tucking inside next to Lavia, allowing Enzo to push higher. Tottenham responded to this structure with their own intense pressing, led by Solanke, who initiated their high press.

    Tottenham pressed in a 1-3 formation, matching Chelsea man-for-man.(below). Even after scoring the opening goal, Tottenham continued their high-intensity press. Palmer and Enzo often dropped deep to help Chelsea’s build-up play. (below)

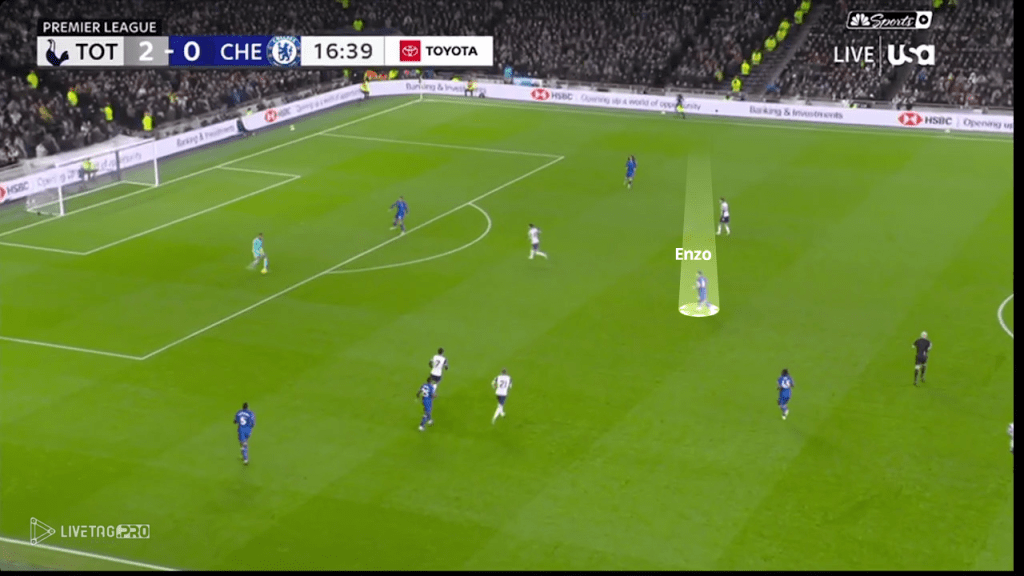
    Tottenham’s pressing was highly effective in the first half. Neither team spent much time passing in midfield, opting instead for direct attacks, which made the game very open and fast-paced. Mistakes in midfield led to chances for both teams. Tottenham’s second goal came from a turnover in the final third, though Chelsea’s defensive line organized in a high- flat shape once again proved costly, as discussed last week.(below)

    Throughout first half of game, Tottenham frequently attempted to create danger with low crosses. However, when defending in a low block, their delayed challenges and lack of physicality allowed Chelsea to create multiple chances. Chelsea’s first goal, despite having a numerical advantage in defense, Tottenham’s players avoided physical duels, giving Sancho the opportunity to score.


    Second Half Performance

    Chelsea made changes at halftime, subbing out Lavia. With Gusto coming on, Chelsea transitioned to a 3-2 build-up structure, with Enzo dropping deeper alongside Caicedo to help initiate play. Gusto’s role in forming a back three allowed Cucurella to push further up the pitch into the attacking third.

    From the start of the second half, Chelsea controlled the tempo and had more possession. Cucurella frequently positioned himself in the half-spaces, receiving ball in the pockets and breaking through Tottenham’s compact press. These movements helped Chelsea create more chances. However, Chelsea also took risks on Cucurella sides, and Tottenham tried to exploit transitions after winning the ball in midfield. Tottenham had opportunities in 3v3 situations but failed to capitalize these chances.
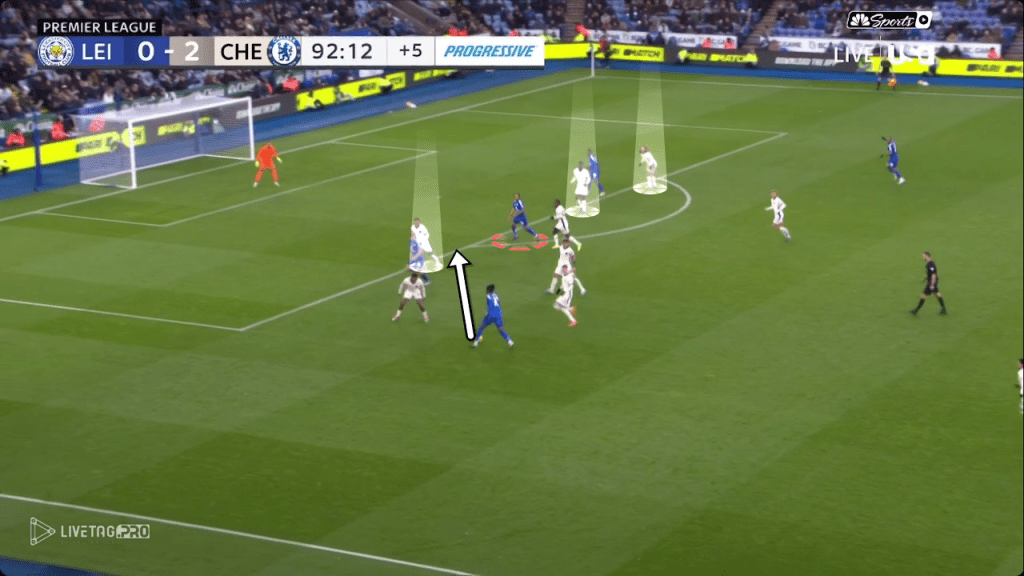
    Individual performances played a crucial role in shaping the match. For example, a poor touch from Bissouma in midfield led to a turnover, though Tottenham’s defenders managed to recover and prevent the attack from progressing. However, Bissouma later conceded a penalty with a poor tackle inside the box, which allowed Chelsea to score.

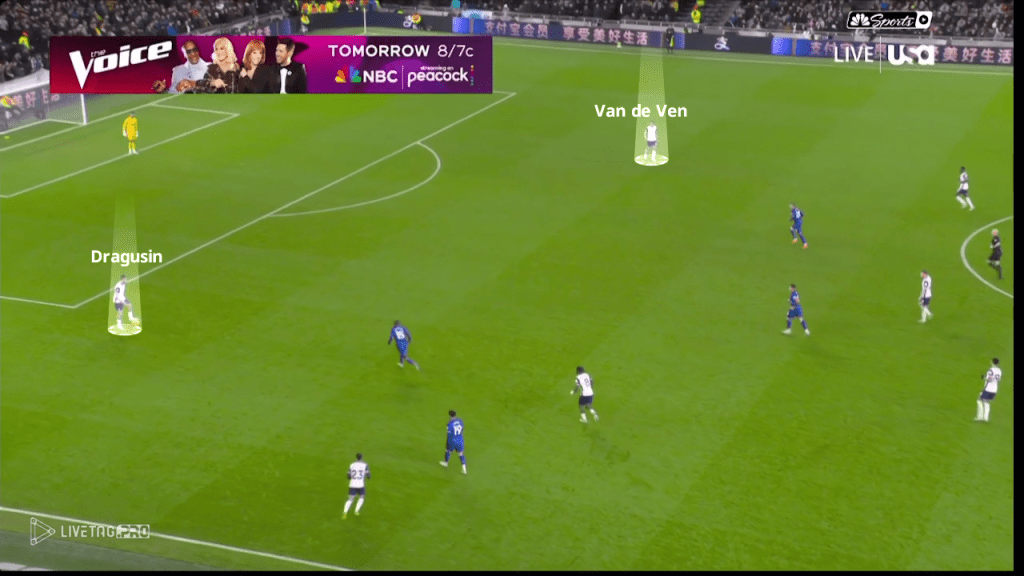
    In the second half, Tottenham sat back more often in a mid-to-low block, looking to exploit counterattacks. After the score was leveled at 2-2, Tottenham began to retain more possession. Their defenders, Van de Ven and Dragusin, positioned themselves very wide, making it harder for Chelsea to press effectively
    Despite balancing the game after the equalizer, Tottenham’s passive defending in the low block was punished by Palmer, who capitalized on a lack of aggression. While Tottenham’s intense high press brought them success throughout the game, their inability to maintain the same intensity in mid-to-low block defending made them vulnerable to Chelsea’s individual brilliance.


    Final Thoughts

    Chelsea continues to struggle against intense pressing, particularly when building from the back. Additionally, their flat defensive line caused them trouble once again this week.

    As for Tottenham, aside from relying on strong individual performances, what do you think they can do to improve their mid-to-low block defending and make it more effective?

  • Leicester City v Chelsea

    Game Moments

    Hello! Today, I’ll be analyzing the key moments, and overall performance from the Leicester vs. Chelsea game.

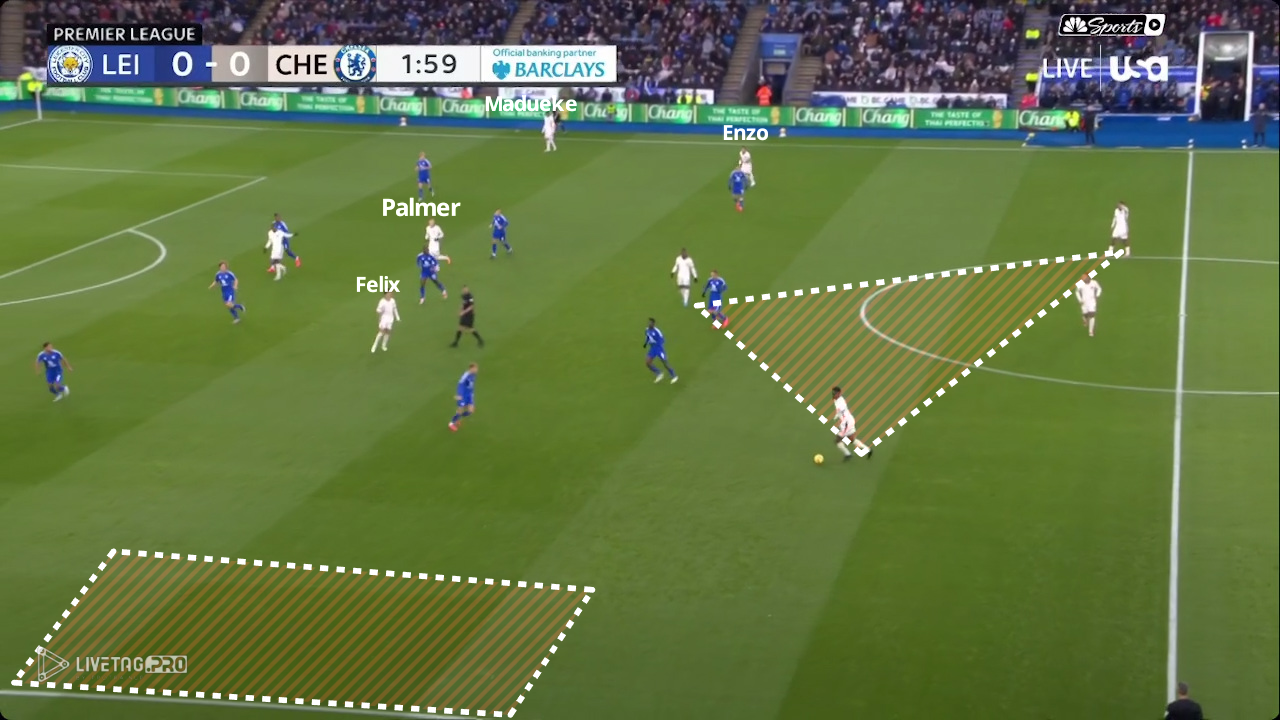
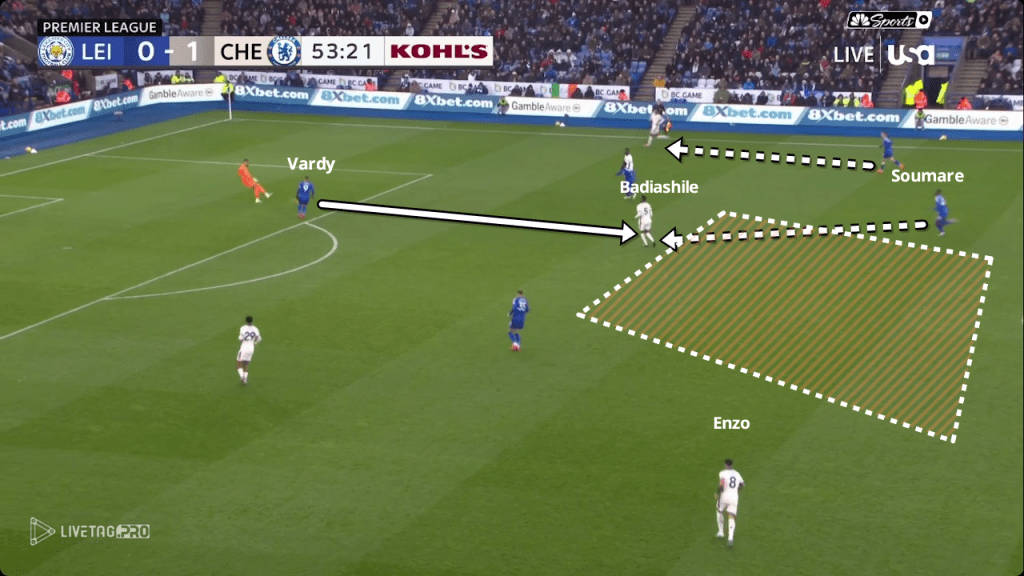
    Leicester started the game with a 5-3-2 low-block defensive structure. On the other hand, Chelsea provided width through Cucurella and Madueke, making use of the side lines. In the early stages of the first half, Chelsea dominated possession. They utilized a 3-1-4-1 formation during their build-up play, with Félix occupying the left half-space and Enzo Fernández taking up positions in the right half-space. This allowed Palmer to operate in more central areas. Cucurella stayed wide, creating space between Faes and Justin for Félix to exploit. Additionally, Badiashile frequently switched play with long diagonal passes to Madueke to quickly alter the direction of Chelsea’s attack.
    The first 15 minutes Chelsea control the game and tempo. Leicester, meanwhile, avoided building from the back and opted for long passes due to Chelsea’s high pressing. Jackson led Chelsea’s press, aiming to direct Leicester’s play towards the left side. This pressing strategy paid off in the 15th minute, as Faes made a crucial mistake under pressure from Jackson, allowing Chelsea to score the opening goal following a recycled ball from a goal kick.

    Throughout the game, Leicester struggled with individual errors and lapses in concentration, which significantly cost them. After Chelsea’s goal, Leicester managed to have more possession in the latter part of the first half. However, Chelsea’s defensive organization limited Leicester’s ability to create clear opportunities.

    When Leicester applied their high press, Chelsea maintained their structure and relied on Cucurella to provide width. While Leicester occasionally succeeded with their press, their players often failed to stay compact, allowing Chelsea to build up play comfortably. By the end of the first half, Leicester generated a few threatening moments but lacked the final touch to capitalize on their chances.

    Second Half Performance

    Both teams resumed the second half as they left off. Chelsea controlled the tempo, sitting deeper and relying on direct counter-attacks to create danger. Leicester attempted to press high in the first 20 minutes of the second half but failed to achieve much due to their disorganized press and continued individual mistakes. Chelsea created a few dangerous opportunities, including one where Madueke inadvertently blocked Palmer’s shot, which could have made it 2-0 much earlier.

    Chelsea dictated the pace of the second half, with Enzo playing a key role in both pressing and attacking phases. When Chelsea pressed higher up, Enzo supported Jackson and continued the press, often breaking forward into the right half-space. Palmer’s positioning in central areas also gave Enzo the freedom to make attacking runs. Chelsea’s second goal came from Cucurella’s cross, which fell to Enzo after a poor clearance. Despite Leicester’s numerical advantage in the box, Enzo capitalized on Faes’ misjudgment to score.

    Late in the game, Leicester capitalized on Chelsea’s defensive line, which had been an issue all season under Maresca’s management. As seen in their match against Arsenal, Chelsea’s high defensive line on the edge of the 18-yard box allowed Leicester to exploit gaps. In the final minutes, Reid made a smart run between Colwill and Badiashile, winning a penalty that brought Leicester back to 2-1. Despite the late goal, Leicester couldn’t create further chances to equalize.

    Final Thoughts

    Chelsea’s defensive setup, particularly their high line, has been a recurring concern. Even in their midweek game against Heidenheim, the same strategy allowed their opponents multiple opportunities. What are your thoughts on Chelsea’s defensive approach and their reliance on a high line?

  • Chelsea v Arsenal

    Game Moments

    After Manchester City dropped two points on Saturday against Brighton, the Chelsea-Arsenal game became crucial for both teams to secure points. Both teams started cautiously, sizing each other up and avoiding early risks to prevent conceding an early goal

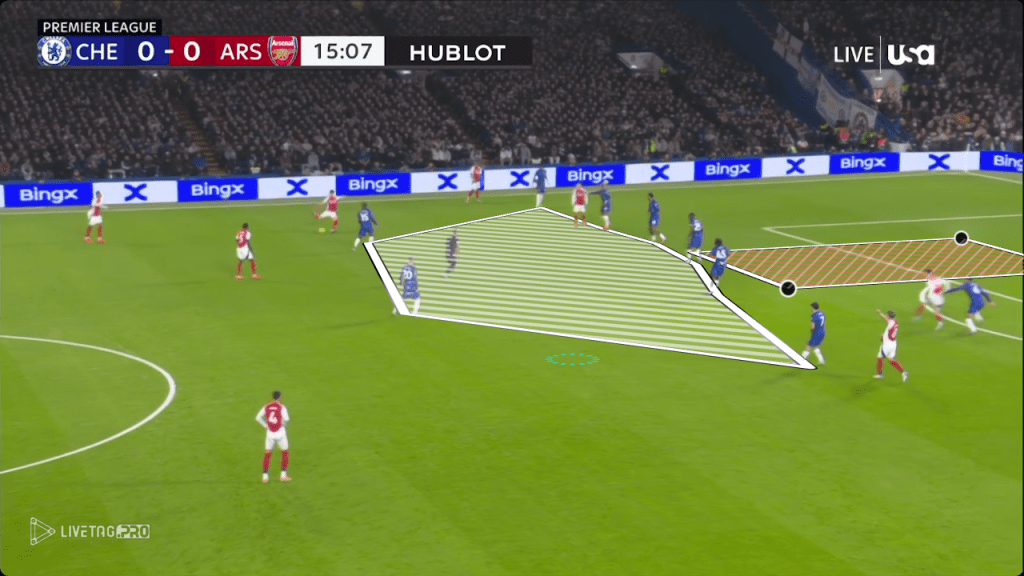
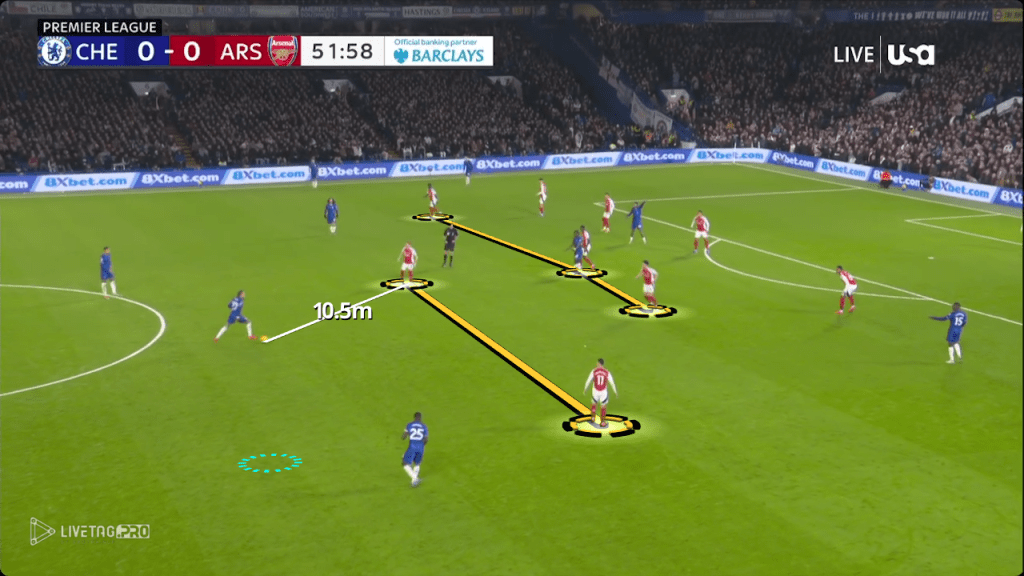
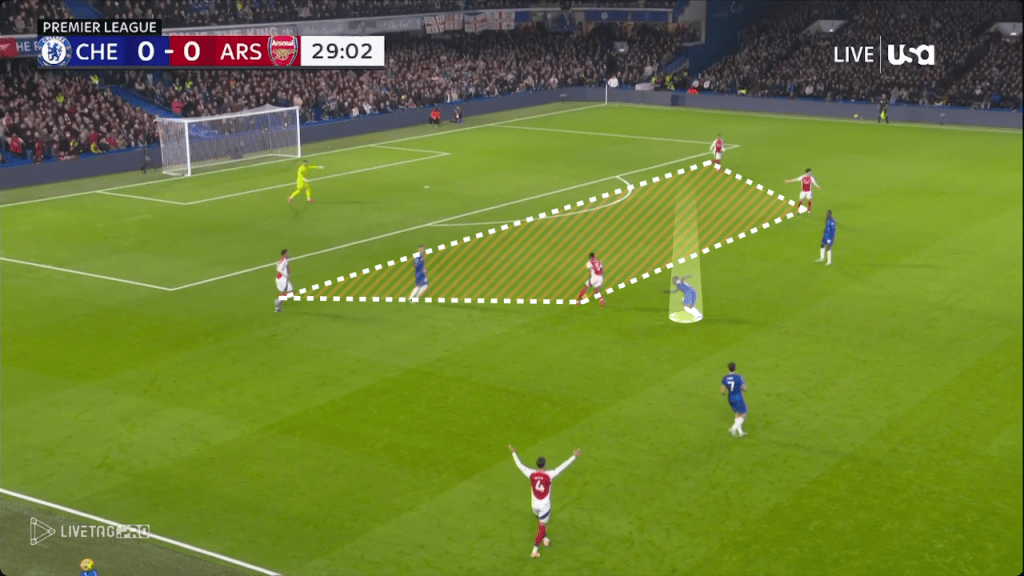
    Arsenal started with high pressing across the pitch. The intense and fast press caused Chelsea problems in building up play. Instead of directing Chelsea into a specific area with their high press, Arsenal applied intense pressure directly on the ball, forcing Chelsea to release the ball quickly. This approach disrupted Chelsea’s rhythm and limited their passing options. The intense Arsenal press forced Chelsea into mistakes while Chelsea trying to pass out from the back, but Arsenal couldn’t create too many dangerous chances from these transitions. Arsenal pressed in a 4-1-4-1 formation, with Havertz often initiating the press. (7:09) During Arsenal’s build-up, Partey and Rice occasionally dropped back, while Caicedo joined the press for Chelsea, with Lavia holding a more defensive position in midfield. Arsenal struggled to find a quick pass and had difficulty advancing the ball into the attacking zone. Most of Arsenal’s creativity came from wide areas, but Cucurella’s strong defense limited their chances.

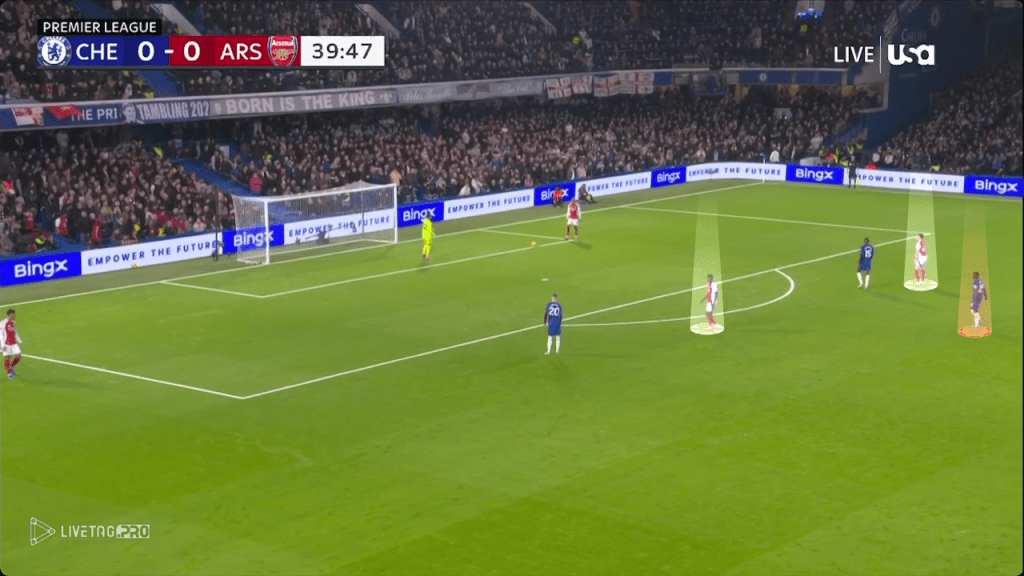
    Chelsea, on the other hand, used a more asymmetrical back three in their buildup. Gusto would tuck into the right half-space, while Cucurella positioned himself on the left in a back three. Although Palmer wasn’t very influential throughout the game, he often positioned himself between Partey, Saliba, and White on the left side to receive the ball.

    At certain points, Arsenal demonstrated plays that we recognize from previous seasons. In the attacking third, they would overload the play on one side (either left or right) to isolate a player on the opposite side for a 1v1 matchup. However, Gusto and Cucurella’s strong defense meant that Arsenal couldn’t create much from these wide positions in the first half. With Partey and Rice dropping deep and Ødegaard drifting to the right, Arsenal struggled to create any activity through the middle.

    Both teams started the second half without making any changes. In the second half, Arsenal’s high pressing continued to win back the ball, but they struggled to transition quickly after winning the ball

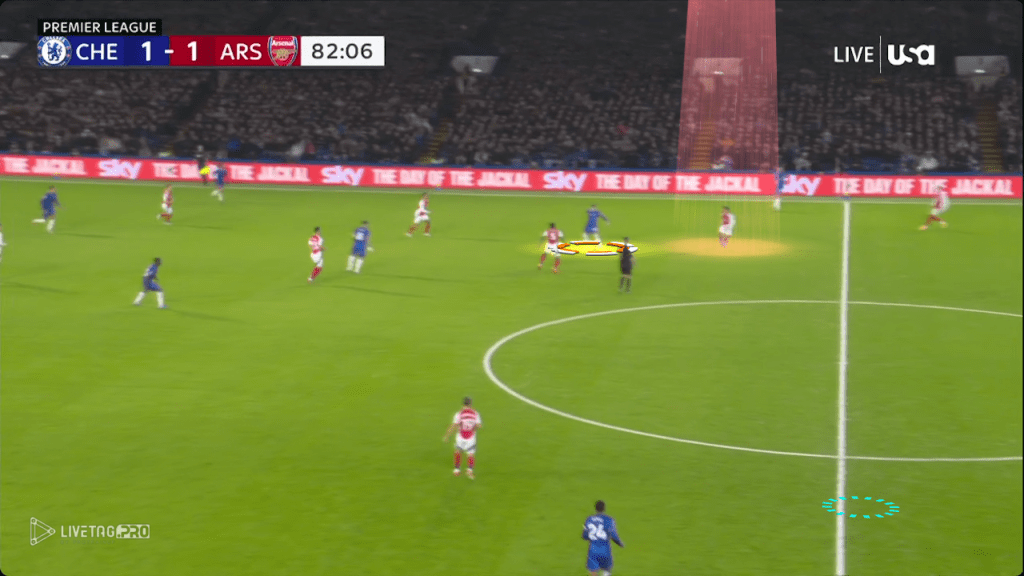
    When Chelsea built up play in the middle third, Arsenal shifted to a 4-2-2-2 low block defense, helping them prepare for quick transitions and support wide areas when Chelsea switched play. Where Arsenal stays in low block, there were moments when players didn’t apply enough pressure on the ball, allowing Chelsea to build threatening attacks. One of these moments came in the second half when Madueke crossed the ball, and Fofana got a touch on it. In a similar play, Neto found the net, scoring an equalizer for Chelsea.

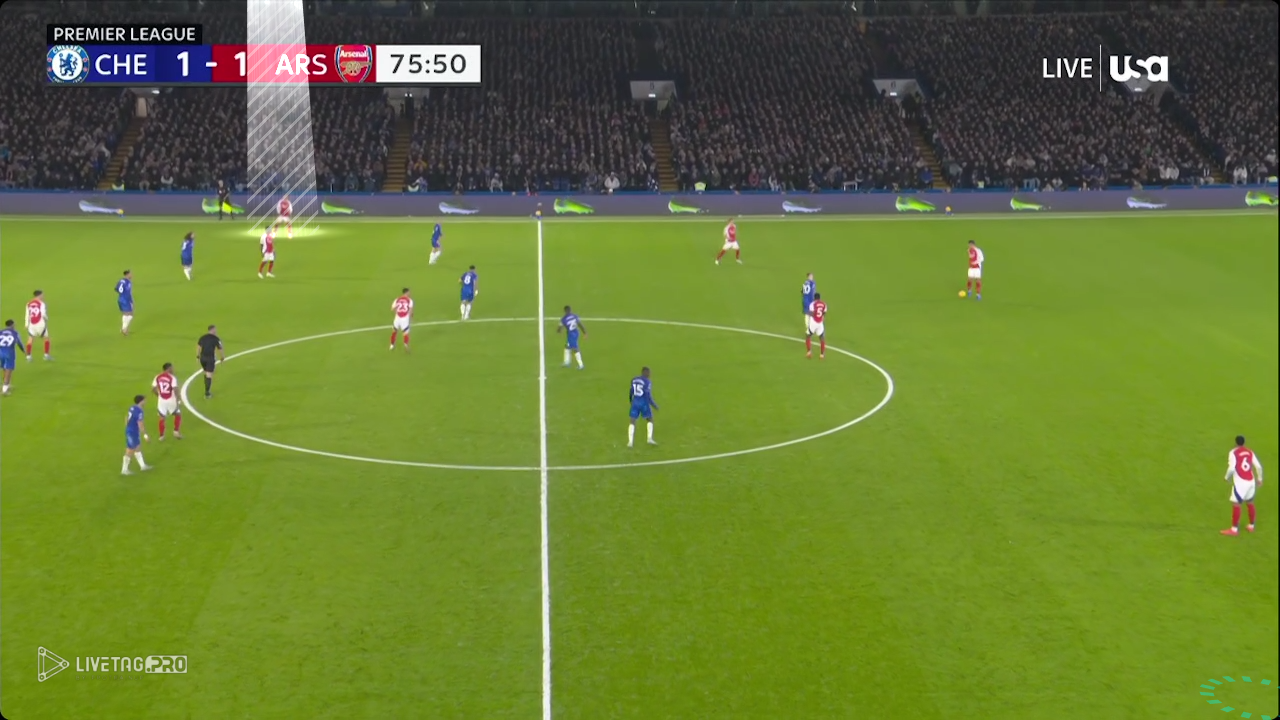
    Arsenal’s goal came from a moment when they effectively used a transition after Chelsea lost possession in midfield. Although Chelsea’s defense recovered quickly, their poor defensive positioning allowed Arsenal to score. After the game was tied, Ben White joined the Arsenal attack more frequently, as seen in several instances throughout the second half. With Ben White joining the attack more frequently, Saka found more space and had 1v1 opportunities, but he still couldn’t create many chances.

    In the end, both teams shared the points with great individual performances defensively. What are your thoughts on Arsenal’s struggles against a low block?

  • Liverpool v Brighton

    Game Moments

    Hello! Today, I’ll be looking at the game moments and the statistics and overall performance in the Liverpool vs. Brighton match. Once again, Liverpool showed how dangerous they can be with direct play. Over the past few years, pressing has become embedded in their DNA, and we can see how effectively they implement it, adapting their pressing with different formations. With this win, Liverpool has now collected the most points in the first 10 weeks of a season over the last four years. Meanwhile, Brighton continues to demonstrate consistency, maintaining a similar points tally in the first 10 games across recent seasons.

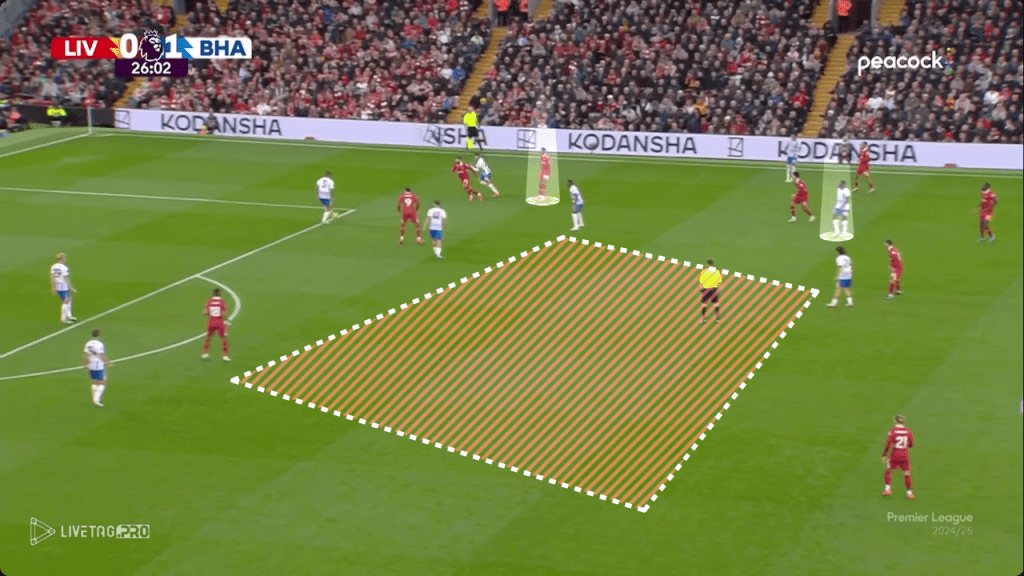
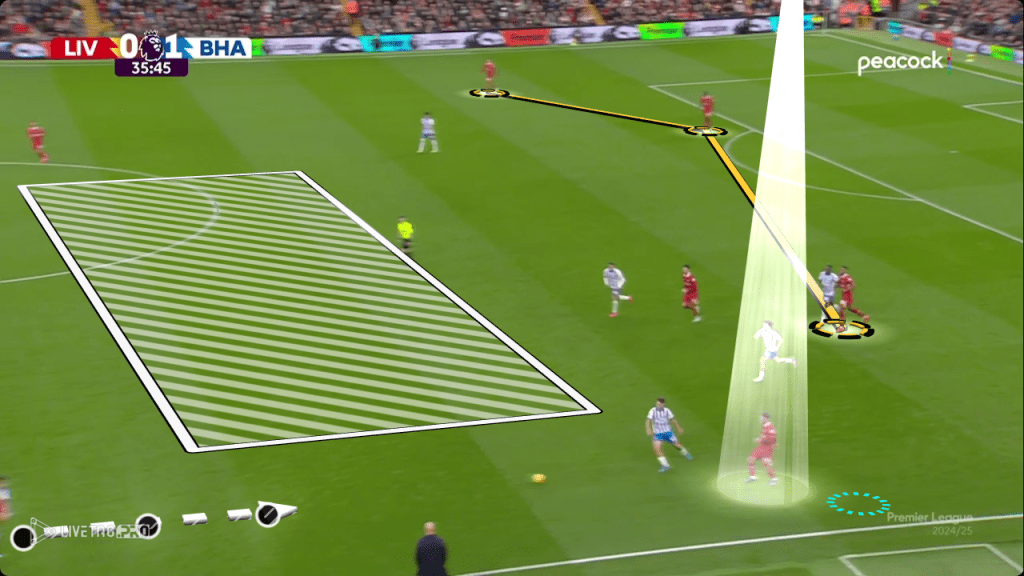
    The first half of the Liverpool-Brighton match was relatively balanced. Liverpool started with a high press, usually led by Nunez, but their pressing formations varied, switching between a 4-3-3 and a 4-2-3-1. Brighton responded calmly to Liverpool’s press, mainly trying to break through the center, and they found success with this approach. Brighton’s first goal came after Ayari picked up the ball in the center, turned towards goal, and launched a dangerous attack. With Ferdi’s control and direction change, they exploited the space at the back to score, putting Brighton up 1-0. Around the 26th minute, Brighton almost doubled their lead when Ayari again found space centrally and played a ball in behind Van Dijk. Liverpool’s press was less effective as Gravenberch held back and didn’t join centrally, making it easier for Brighton to exploit the middle repeatedly.

    Brighton creates space in the center of the pitch.

    Brighton exploits space in the center, with Ayari playing a through pass behind Van Dijk.

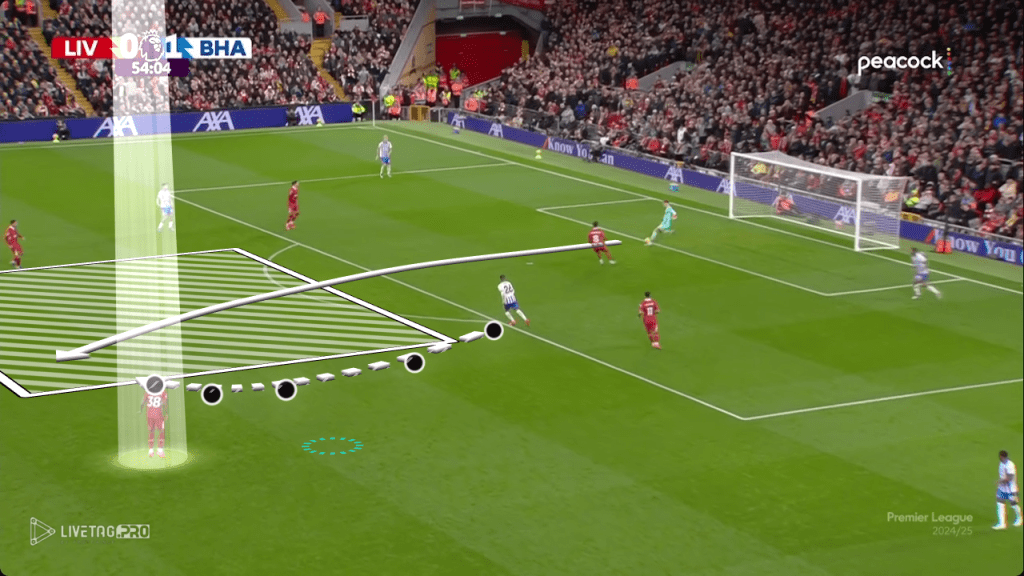
    Liverpool could have benefited from directing their press more toward Brighton’s right side. Throughout the match, Brighton barely used the right side for their build-up, instead focusing on Mitoma on the left and isolating Ferdi on the right. When Liverpool directed Brighton’s play toward Gakpo and Tsimikas’s side, they regained possession more quickly.

    Liverpool forcing the Brighton to their right side and wins the ball

    In the first half, Trent held a deeper position on the right, forming an almost flat back four. His role changed in the second half, as he moved more centrally and even drifted to the left to support the build-up. McAllister also drifted left in the first half to create an overload on the left side, but Liverpool couldn’t fully capitalize on the spaces Brighton left in the central area.

    In the second half, Liverpool continued with intense pressing, but gaps in the center remained. With Trent’s adjusted role in the build-up, McAllister advanced to a more central position. Brighton kept trying to break through the center. As Gravenberch joined the press more frequently, Welbeck dropped deeper to support the build-up, exploiting the space Gravenberch left.

    Liverpool effectively used direct play in the second half, creating a dangerous opportunity with only three passes after Salah switched the play to Gakpo, showing just how effective Liverpool’s direct style can be. They continued to find success with quick, direct plays, especially when Jones and Diaz combined to assist Salah’s goal.

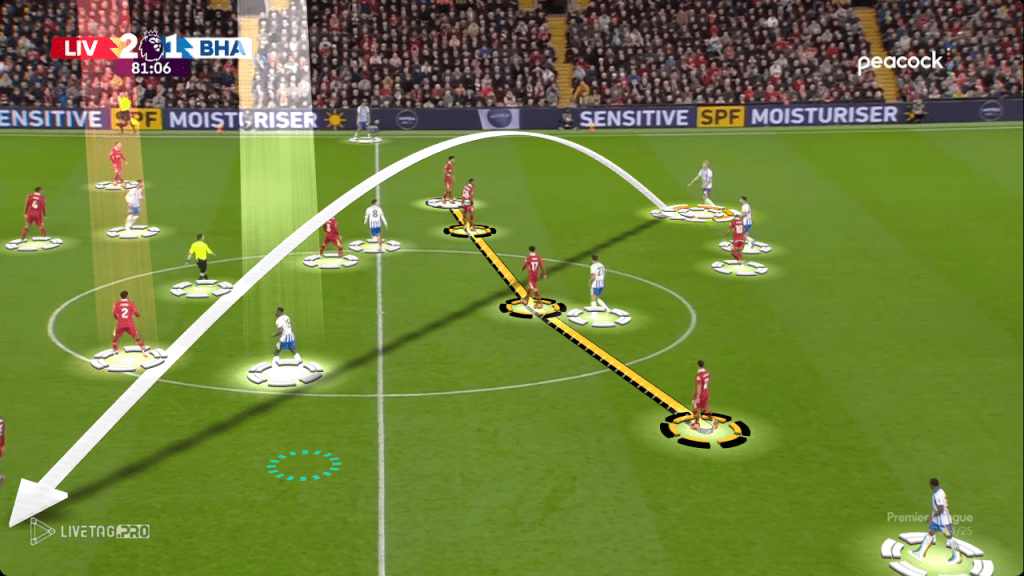
    Overall, while Liverpool didn’t create many chances from positional plays, their quick, direct approach secured the victory. In the second half, as Liverpool dropped back to protect their lead, Brighton started using Van Hecke’s diagonal passes to reach Mitoma, capitalizing on Welbeck’s deep-dropping movements to isolate Trent against Mitoma in 1v1 situations.

    In summary, despite the balanced nature of the game, Liverpool’s direct play proved decisive. What are your thoughts on the Liverpool-Brighton match?